TOC
弊blogでも以前取り上げたことのあるPodmanですが、改めて取り上げたいと思います。
UbuntuでPodmanを利用する状況の変化
Podman自体がUbuntuのパッケージとして収録された(20.10以降)
podman : Groovy (20.10) : Ubuntu
執筆時点では20.10と21.04用のパッケージはどちらも2.0.6なので、Upstreamの最新バージョンである2.1.0には追随していません。
Cockpit用のPodman管理パッケージであるcockpit-podmanもUbuntuのパッケージとして収録されたので、問題がなければ今後はCockpitからもコンテナ状態を確認できる(21.04以降)
Add cockpit-podman to Ubuntu · Issue #481 · cockpit-project/cockpit-podman
cockpit-podman package : Ubuntu
なお、Ubuntu 21.04は数字の通り2021年4月のリリース予定版なので、現状では開発版の扱いです。
ということで、今回はUbuntuのパッケージになったPodman(とCockpitのPodman統合)をインストールします。
Ubuntu 20.04でなんとかしてUbuntu 21.04用のパッケージを入れたい
現状20.04用のパッケージはなく、依存関係を攻略しないとインストールできない
動作確認するのはUbuntu 20.04なので、最初は関連するpodmanパッケージを21.04から借りようとしていました。
Debian系のディストロで一部のパッケージだけ借りてくる手順についても以前まとめていますので、これに則って作業します。
【非推奨】Ubuntuで一部のパッケージだけ将来のリリースから持ってくる
現在使っている20.04を基本として固定するので、/etc/apt/apt.conf.d/01ubuntu-baseとして以下の内容で作成します。
APT::Default-Release "focal";
Ubuntu 21.04のuniverse(とmain)をapt-lineに追加するので、/etc/apt/sources.list.d/hirsute.listとして以下の内容で作成します。
deb http://jp.archive.ubuntu.com/ubuntu/ hirsute main universe
ここまでは問題なかったんですが、いざpodmanとcockpit-podmanをインストールしようとしたところ、問題に気付きます。
# apt-get update
# apt-get install podman cockpit-podman -t hirsute
パッケージリストを読み込んでいます... 完了
依存関係ツリーを作成しています
状態情報を読み取っています... 完了
以下のパッケージが自動でインストールされましたが、もう必要とされていません:
  linux-headers-5.4.0-45 linux-headers-5.4.0-45-generic linux-headers-5.4.0-47
  linux-headers-5.4.0-47-generic linux-image-5.4.0-45-generic
  linux-image-5.4.0-47-generic linux-modules-5.4.0-45-generic
  linux-modules-5.4.0-47-generic linux-modules-extra-5.4.0-45-generic
  linux-modules-extra-5.4.0-47-generic
これを削除するには 'apt autoremove' を利用してください。
以下の追加パッケージがインストールされます:
  buildah cockpit-bridge cockpit-system containernetworking-plugins
  fuse-overlayfs fuse3 golang-github-containers-common libc-bin libc-dev-bin
  libc6 libc6:i386 libc6-dbg libc6-dev libfuse3-3 libjson-glib-1.0-0
  libjson-glib-1.0-common libnsl-dev libnsl2 libnsl2:i386 libnss-nis
  libnss-nis:i386 libnss-nisplus libnss-nisplus:i386 libostree-1-1
  libpwquality-tools libselinux1 libselinux1:i386 libtirpc-common libtirpc-dev
  libtirpc3 libtirpc3:i386 locales rpcsvc-proto tini
提案パッケージ:
  containers-storage glibc-doc glibc-doc:i386 locales:i386
以下のパッケージは「削除」されます:
  fuse
以下のパッケージが新たにインストールされます:
  buildah cockpit-bridge cockpit-podman cockpit-system
  containernetworking-plugins fuse-overlayfs fuse3
  golang-github-containers-common libfuse3-3 libnsl-dev libnsl2 libnsl2:i386
  libnss-nis libnss-nis:i386 libnss-nisplus libnss-nisplus:i386 libostree-1-1
  libpwquality-tools libtirpc-common libtirpc-dev libtirpc3 libtirpc3:i386
  podman rpcsvc-proto tini
以下のパッケージはアップグレードされます:
  libc-bin libc-dev-bin libc6 libc6:i386 libc6-dbg libc6-dev
  libjson-glib-1.0-0 libjson-glib-1.0-common libselinux1 libselinux1:i386
  locales
アップグレード: 11 個、新規インストール: 25 個、削除: 1 個、保留: 1899 個。
48.4 MB のアーカイブを取得する必要があります。
この操作後に追加で 118 MB のディスク容量が消費されます。
インストールしようとすると依存パッケージも同時に更新されるのは当然なのですが、
- 更新パッケージにlibc6が入っている
- 保留パッケージの数が1899なので、インストールを続行した後に
apt-get upgradeをすると保留パッケージが全部更新される
前者もマズいのですが、後者はこのPCがもはや20.10に入れ替わってしまうことを意味するので、それはなんとしても避けたい。
ひっかかる依存を確認する
$ apt-cache show podman cockpit-podman | grep -E "^(Package|Depends)"
Package: podman
Depends: init-system-helpers (>= 1.52), libc6 (>= 2.32), libdevmapper1.02.1 (>= 2:1.02.97), libgpgme11 (>= 1.4.1), libseccomp2 (>= 2.4.1), conmon (>= 2.0.18~), containernetworking-plugins, golang-github-containers-common, crun | runc (>= 1.0.0~rc92~)
Package: cockpit-podman
Depends: cockpit-bridge (>= 138), cockpit-system (>= 138), podman (>= 2.0.4)
podmanパッケージがlibc6の2.32以降を必要とする1ので、これを回避する方法を考えます。
$ apt-cache policy libc6
libc6:
  インストールされているバージョン: 2.31-0ubuntu9.1
  候補:               2.31-0ubuntu9.1
  バージョンテーブル:
     2.32-0ubuntu3 500
        500 http://jp.archive.ubuntu.com/ubuntu hirsute/main amd64 Packages
 *** 2.31-0ubuntu9.1 990
        990 http://jp.archive.ubuntu.com/ubuntu focal-updates/main amd64 Packages
        100 /var/lib/dpkg/status
     2.31-0ubuntu9 990
        990 http://jp.archive.ubuntu.com/ubuntu focal/main amd64 Packages
ふとDebian用のpodmanパッケージを覗いてみた結果…いけるやん?
せっかくやると決めたのにここで諦めるのはちょっと…ということで、往生際悪く参考までにDebianのpodmanパッケージを見てみます。
Debian – bullseye の podman パッケージに関する詳細
- dep: libc6 (>= 2.15) [amd64, s390x]
GNU C ライブラリ: 共有ライブラリ 以下のパッケージによって提供される仮想パッケージでもあります: libc6-udeb
あれ、いけるやん。早速今度はDebianのapt-lineを追加してみます。/etc/apt/sources.list.d/bullseye.listを以下の内容で作成します。
deb [arch=amd64 signed-by=/usr/share/keyrings/debian-archive-keyring.gpg] http://deb.debian.org/debian bullseye main contrib
signed-byで指定しているgpgファイルはdebian-archive-keyringパッケージのインストールで格納されます。2
Debianの公開鍵のインストールとaptのキャッシュを更新します。
# apt-get install debian-archive-keyring
# apt-get update
インストール候補に入っていることを確認します。
$ apt-cache policy podman
podman:
  インストールされているバージョン: (なし)
  候補:               2.0.6+dfsg1-2
  バージョンテーブル:
     2.0.6+dfsg1-2 500
        500 http://deb.debian.org/debian bullseye/main amd64 Packages
     2.0.6+dfsg1-1ubuntu1 500
        500 http://jp.archive.ubuntu.com/ubuntu hirsute/universe amd64 Packages
Debianの方のpodmanパッケージの依存を確認します。
$ apt-cache show podman=2.0.6+dfsg1-2 | grep -E "^(Package|Depends)"
Package: podman
Depends: init-system-helpers (>= 1.52), libc6 (>= 2.15), libdevmapper1.02.1 (>= 2:1.02.97), libgpgme11 (>= 1.4.1), libseccomp2 (>= 2.4.1), conmon (>= 2.0.18~), containernetworking-plugins, golang-github-containers-common, crun | runc (>= 1.0.0~rc92~)
libc6の依存が2.15以上になっているのでUbuntu 20.04でもlibc6の依存は問題なくなります。
禁断のDebianパッケージとちゃんぽん
割とまじめにやらない方がいいんですが、Ubuntu 20.04の環境にDebian(Bullseye)のパッケージを入れます。Ubuntu 21.04のlibc6が入ってしまうとめちゃくちゃになるので、優先度としては以下になるようにします。
- Ubuntu 20.04
- Debian Bullseye
- Ubuntu 21.04
先に基本としてUbuntu 20.04が入る(優先度が990)ようにしてあるため、Debian Bullseyeを普通の優先度、Ubuntu 21.04を99(指定しないとインストールしない優先度)にします。/etc/apt/preferences.d/hirsuteを以下の内容で作成します。
Package: *
Pin: release a=hirsute
Pin-Priority: 99
また、念の為libc6をUbuntu 20.04以外から(指定した場合以外)インストールしないようにします。/etc/apt/preferences.d/packagelibc6を以下の内容で作成します。
Package: libc6
Pin: release a=focal
Pin-Priority: 999

Package: libc6
Pin: release a=focal-updates
Pin-Priority: 999

Package: libc6
Pin: release a=focal-backports
Pin-Priority: 999
改めてこの状態でインストールするパッケージを確認します。
$ apt-cache policy libc6 podman
libc6:
  インストールされているバージョン: 2.31-0ubuntu9.1
  候補:               2.31-0ubuntu9.1
  バージョンテーブル:
     2.32-0ubuntu3 99
         99 http://jp.archive.ubuntu.com/ubuntu hirsute/main amd64 Packages
     2.31-4 500
        500 http://deb.debian.org/debian bullseye/main amd64 Packages
 *** 2.31-0ubuntu9.1 999
        990 http://jp.archive.ubuntu.com/ubuntu focal-updates/main amd64 Packages
        100 /var/lib/dpkg/status
     2.31-0ubuntu9 999
        990 http://jp.archive.ubuntu.com/ubuntu focal/main amd64 Packages
podman:
  インストールされているバージョン: (なし)
  候補:               2.0.6+dfsg1-2
  バージョンテーブル:
     2.0.6+dfsg1-2 500
        500 http://deb.debian.org/debian bullseye/main amd64 Packages
     2.0.6+dfsg1-1ubuntu1 99
         99 http://jp.archive.ubuntu.com/ubuntu hirsute/universe amd64 Packages
Podmanをインストールします。
# apt-get install podman
パッケージリストを読み込んでいます... 完了
依存関係ツリーを作成しています
状態情報を読み取っています... 完了
提案パッケージ:
  containers-storage
推奨パッケージ:
  buildah fuse-overlayfs
以下のパッケージが新たにインストールされます:
  podman
アップグレード: 0 個、新規インストール: 1 個、削除: 0 個、保留: 1 個。
9,272 kB 中 0 B のアーカイブを取得する必要があります。
この操作後に追加で 37.2 MB のディスク容量が消費されます。
(データベースを読み込んでいます ... 現在 364826 個のファイルとディレクトリがインストールされています。)
.../podman_2.0.6+dfsg1-2_amd64.deb を展開する準備をしています ...
podman (2.0.6+dfsg1-2) を展開しています...
podman (2.0.6+dfsg1-2) を設定しています ...
Created symlink /etc/systemd/user/sockets.target.wants/podman.socket → /usr/lib/systemd/user/podman.socket.
Created symlink /etc/systemd/system/sockets.target.wants/podman.socket → /lib/systemd/system/podman.socket.
podman.service is a disabled or a static unit, not starting it.
Created symlink /etc/systemd/system/multi-user.target.wants/io.podman.service → /lib/systemd/system/io.podman.service.
Created symlink /etc/systemd/system/sockets.target.wants/io.podman.socket → /lib/systemd/system/io.podman.socket.
man-db (2.9.1-1) のトリガを処理しています ...
先ほどと違い、保留パッケージが1個3だけになっているので、気をつければそのまま運用できそうということにします。
PodmanのCockpit統合であるcockpit-podmanはDebian BullseyeにはまだパッケージがないのでUbuntu 21.04のものをインストールします。
# apt-get install cockpit-podman
パッケージリストを読み込んでいます... 完了
依存関係ツリーを作成しています
状態情報を読み取っています... 完了
以下の追加パッケージがインストールされます:
  cockpit-bridge cockpit-system libpwquality-tools
以下のパッケージが新たにインストールされます:
  cockpit-bridge cockpit-podman cockpit-system libpwquality-tools
アップグレード: 0 個、新規インストール: 4 個、削除: 0 個、保留: 1 個。
3,856 kB のアーカイブを取得する必要があります。
この操作後に追加で 10.2 MB のディスク容量が消費されます。
続行しますか? [Y/n]
取得:1 http://jp.archive.ubuntu.com/ubuntu focal-backports/universe amd64 cockpit-bridge amd64 227-1~ubuntu20.04.1 [549 kB]
取得:2 http://jp.archive.ubuntu.com/ubuntu focal/universe amd64 libpwquality-tools amd64 1.4.2-1build1 [9,640 B]
取得:3 http://jp.archive.ubuntu.com/ubuntu focal-backports/universe amd64 cockpit-system all 227-1~ubuntu20.04.1 [2,033 kB]
取得:4 http://jp.archive.ubuntu.com/ubuntu hirsute/universe amd64 cockpit-podman all 25-1 [1,264 kB]
3,856 kB を 0秒 で取得しました (10.7 MB/s)
以前に未選択のパッケージ cockpit-bridge を選択しています。
(データベースを読み込んでいます ... 現在 364980 個のファイルとディレクトリがインストールされています。)
.../cockpit-bridge_227-1~ubuntu20.04.1_amd64.deb を展開する準備をしています ...
cockpit-bridge (227-1~ubuntu20.04.1) を展開しています...
以前に未選択のパッケージ libpwquality-tools を選択しています。
.../libpwquality-tools_1.4.2-1build1_amd64.deb を展開する準備をしています ...
libpwquality-tools (1.4.2-1build1) を展開しています...
以前に未選択のパッケージ cockpit-system を選択しています。
.../cockpit-system_227-1~ubuntu20.04.1_all.deb を展開する準備をしています ...
cockpit-system (227-1~ubuntu20.04.1) を展開しています...
以前に未選択のパッケージ cockpit-podman を選択しています。
.../cockpit-podman_25-1_all.deb を展開する準備をしています ...
cockpit-podman (25-1) を展開しています...
libpwquality-tools (1.4.2-1build1) を設定しています ...
cockpit-bridge (227-1~ubuntu20.04.1) を設定しています ...
cockpit-system (227-1~ubuntu20.04.1) を設定しています ...
cockpit-podman (25-1) を設定しています ...
man-db (2.9.1-1) のトリガを処理しています ...
バージョン確認をします。
$ podman version
Version:      2.0.6
API Version:  1
Go Version:   go1.15.2
Built:        Thu Jan  1 09:00:00 1970
OS/Arch:      linux/amd64
$ podman info --debug
host:
  arch: amd64
  buildahVersion: 1.15.2
  cgroupVersion: v1
  conmon:
    package: 'conmon: /usr/libexec/podman/conmon'
    path: /usr/libexec/podman/conmon
    version: 'conmon version 2.0.20, commit: unknown'
  cpus: 4
  distribution:
    distribution: ubuntu
    version: "20.04"
  eventLogger: file
  hostname: hogehoge-ThinkPad-X270-W10DG
  idMappings:
    gidmap:
    - container_id: 0
      host_id: 1000
      size: 1
    - container_id: 1
      host_id: 10000
      size: 65536
    - container_id: 65537
      host_id: 100000
      size: 65536
    uidmap:
    - container_id: 0
      host_id: 1000
      size: 1
    - container_id: 1
      host_id: 10000
      size: 65536
    - container_id: 65537
      host_id: 100000
      size: 65536
  kernel: 5.4.0-52-generic
  linkmode: dynamic
  memFree: 7712616448
  memTotal: 16661516288
  ociRuntime:
    name: runc
    package: 'runc: /usr/sbin/runc'
    path: /usr/sbin/runc
    version: 'runc version spec: 1.0.1-dev'
  os: linux
  remoteSocket:
    path: /run/user/1000/podman/podman.sock
  rootless: true
  slirp4netns:
    executable: /usr/bin/slirp4netns
    package: 'slirp4netns: /usr/bin/slirp4netns'
    version: |-
      slirp4netns version 1.1.4
      commit: unknown
      libslirp: 4.3.1-git
      SLIRP_CONFIG_VERSION_MAX: 3
  swapFree: 0
  swapTotal: 0
  uptime: 180h 33m 4.54s (Approximately 7.50 days)
registries: {}
store:
  configFile: /home/hogehoge/.config/containers/storage.conf
  containerStore:
    number: 0
    paused: 0
    running: 0
    stopped: 0
  graphDriverName: vfs
  graphOptions: {}
  graphRoot: /home/hogehoge/.local/share/containers/storage
  graphStatus: {}
  imageStore:
    number: 24
  runRoot: /run/user/1000/containers
  volumePath: /home/hogehoge/.local/share/containers/storage/volumes
version:
  APIVersion: 1
  Built: 0
  BuiltTime: Thu Jan  1 09:00:00 1970
  GitCommit: ""
  GoVersion: go1.15.2
  OsArch: linux/amd64
  Version: 2.0.6
Podmanの動作確認とこれまでのPodmanからの変更点
Podmanはdockerと違って一般ユーザーでもコマンド感覚で実行できるので、そのまま動作確認をします。
$ podman container run hello-world
Error: unable to pull hello-world: open /home/hogehoge/.config/containers/policy.json: no such file or directory
普通にエラーです。えー。
どうやら、コンテナレジストリのポリシーを定義するpolicy.jsonというファイルを~/.config/containers/policy.jsonか/etc/containers/policy.jsonで定義しないといけないらしく、今回はシステムワイドにやるつもりはないので、テンプレートらしいファイルを持ってきます。
$ mkdir ~/.config/containers
$ curl -L -o ~/.config/containers/policy.json https://raw.githubusercontent.com/containers/skopeo/master/default-policy.json
もう一回確認します。
$ podman container run hello-world
Error: unable to pull hello-world: image name provided is a short name and no search registries are defined in the registries config file.
エラーメッセージが変わりました。最初からエラーを2つ出してほしい感はありますが、デフォルトのコンテナレジストリが定義されてない状態でコンテナ名だけ指定しても実行できないっぽいので、dockerhubを指定します。
$ podman container run docker.io/hello-world
Trying to pull docker.io/hello-world...
Getting image source signatures
Copying blob 0e03bdcc26d7 done
Copying config bf756fb1ae done
Writing manifest to image destination
Storing signatures

Hello from Docker!
This message shows that your installation appears to be working correctly.

To generate this message, Docker took the following steps:
 1. The Docker client contacted the Docker daemon.
 2. The Docker daemon pulled the "hello-world" image from the Docker Hub.
    (amd64)
 3. The Docker daemon created a new container from that image which runs the
    executable that produces the output you are currently reading.
 4. The Docker daemon streamed that output to the Docker client, which sent it
    to your terminal.

To try something more ambitious, you can run an Ubuntu container with:
 $ docker run -it ubuntu bash

Share images, automate workflows, and more with a free Docker ID:
 https://hub.docker.com/

For more examples and ideas, visit:
 https://docs.docker.com/get-started/
というわけで、ようやく以前の動作確認と同じ状態まで持ってこれました。コンテナの状態も確認できます。
$ podman container ls -a
CONTAINER ID  IMAGE                                 COMMAND  CREATED             STATUS                         PORTS   NAMES
967bdf7d985e  docker.io/library/hello-world:latest  /hello   About a minute ago  Exited (0) About a minute ago          musing_bell
前回の動作確認時は/etc/containers/registries.confにコンテナレジストリを定義しましたが、今回は~/.config/containers/registries.confに設定を書いてみます。自宅内LANにSonatype Nexusでコンテナレジストリも立てているので、そちらからも参照できるようにしています。
NanoPi M4V2にSonatype Nexus3をセットアップして、Dockerのプライベートリポジトリを作る
[registries.search]
registries = ['docker.io', 'quay.io', '192.168.1.210:18080']

[registries.insecure]
registries = ["192.168.1.210:18080", "192.168.1.210:28080"]
今度はnginx:latestを取得してみます。
$ podman image pull nginx:latest
Trying to pull docker.io/library/nginx:latest...
Getting image source signatures
Copying blob 1966ea362d23 done
Copying blob 166a2418f7e8 done
Copying blob 5a9f1c0027a7 done
Copying blob b5c20b2b484f done
Copying blob bb79b6b2107f done
Copying config c39a868aad done
Writing manifest to image destination
Storing signatures
c39a868aad02a383c7e490e0fc4a5b0217f667f2de764bc2755e315a5adf64a1
取得したイメージからコンテナの作成、コンテナの起動をします。
$ podman container create --name demo-nginx -p 8080:80 c39a868aad02a383c7e490e0fc4a5b0217f667f2de764bc2755e315a5adf64a1
d7b585890d98a0fcfb3718199b4f448ec3c30c2e7a78bb3de09cedc2d36ea777
$ podman container start d7b585890d98a0fcfb3718199b4f448ec3c30c2e7a78bb3de09cedc2d36ea777
d7b585890d98a0fcfb3718199b4f448ec3c30c2e7a78bb3de09cedc2d36ea777
コンテナにアクセスしてみます。
$ curl http://localhost:8080/ --verbose
*   Trying 127.0.0.1:8080...
* TCP_NODELAY set
* Connected to localhost (127.0.0.1) port 8080 (#0)
> GET / HTTP/1.1
> Host: localhost:8080
> User-Agent: curl/7.68.0
> Accept: */*
>
* Mark bundle as not supporting multiuse
< HTTP/1.1 200 OK
< Server: nginx/1.19.4
< Date: Sat, 07 Nov 2020 02:42:51 GMT
< Content-Type: text/html
< Content-Length: 612
< Last-Modified: Tue, 27 Oct 2020 15:09:20 GMT
< Connection: keep-alive
< ETag: "5f983820-264"
< Accept-Ranges: bytes
<
<!DOCTYPE html>
<html>
<head>
<title>Welcome to nginx!</title>
<style>
    body {
        width: 35em;
        margin: 0 auto;
        font-family: Tahoma, Verdana, Arial, sans-serif;
    }
</style>
</head>
<body>
<h1>Welcome to nginx!</h1>
<p>If you see this page, the nginx web server is successfully installed and
working. Further configuration is required.</p>

<p>For online documentation and support please refer to
<a href="http://nginx.org/">nginx.org</a>.<br/>
Commercial support is available at
<a href="http://nginx.com/">nginx.com</a>.</p>

<p><em>Thank you for using nginx.</em></p>
</body>
</html>
* Connection #0 to host localhost left intact
動作を確認したので、コンテナの停止、削除、イメージの削除をします。
$ podman container stop d7b585890d98a0fcfb3718199b4f448ec3c30c2e7a78bb3de09cedc2d36ea777
d7b585890d98a0fcfb3718199b4f448ec3c30c2e7a78bb3de09cedc2d36ea777
$ podman container rm d7b585890d98a0fcfb3718199b4f448ec3c30c2e7a78bb3de09cedc2d36ea777
d7b585890d98a0fcfb3718199b4f448ec3c30c2e7a78bb3de09cedc2d36ea777
$ podman image rm c39a868aad02a383c7e490e0fc4a5b0217f667f2de764bc2755e315a5adf64a1
Untagged: docker.io/library/nginx:latest
Deleted: c39a868aad02a383c7e490e0fc4a5b0217f667f2de764bc2755e315a5adf64a1
問題ありません。
CockpitからPodmanの状態を確認する
cockpitのインストール
Red Hatが支援するサーバー監視ソリューションであるCockpitにPodmanを組み込むとどうなるか見ていきます。まずはcockpitのインストールから。
# apt-get install cockpit
インストールが終わったら自動的にTCPの9090番ポートで待ち受けるので、ブラウザからhttp://localhost:9090にアクセスします。
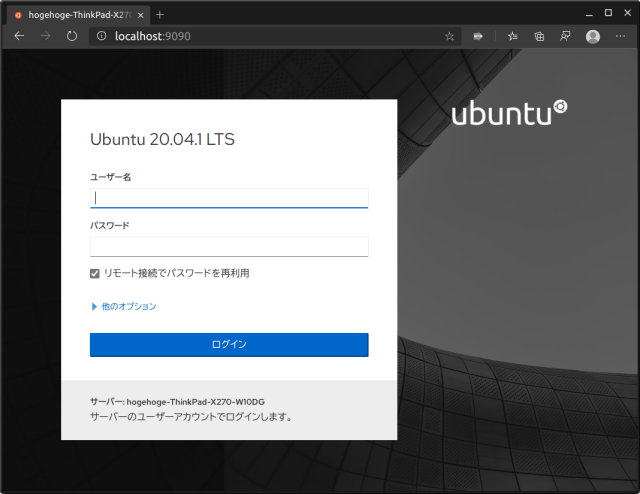
Podmanの様子は一般ユーザーで見れるので、一般ユーザーでログインします。
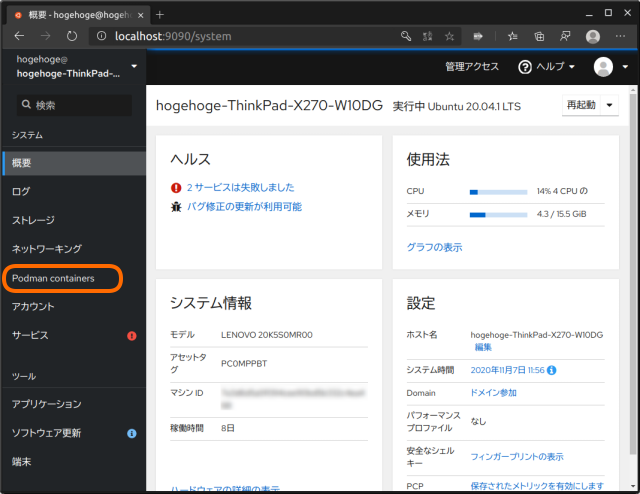
Podmanのステータス画面
cockpit-podmanをインストールしている場合は、左側にPodman containersがあるのでクリックしてみます。
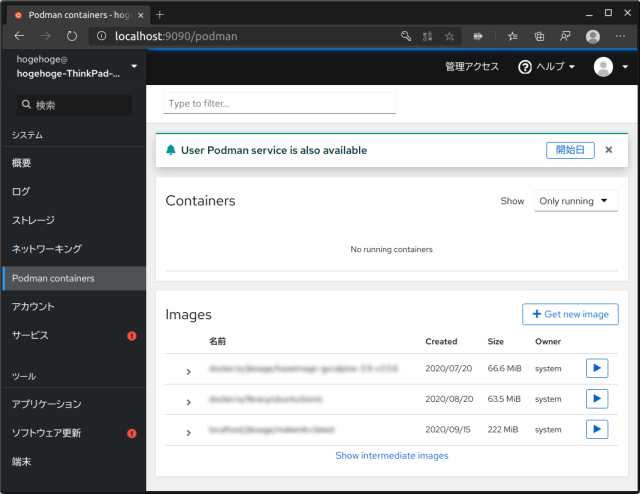
コンテナが実行されていない状態の画面ですが、ローカルにあるPodmanイメージが表示されています。
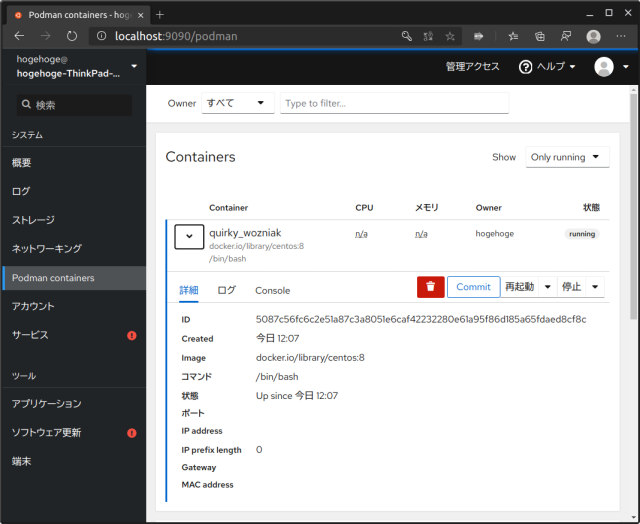
試しに適当にCentOS8のdockerコンテナを引っ張ってきてpodmanで実行したところです。詳細とログとConsoleで参照ができます。

ログはコンテナに対して実行した出力がそのまま表示されます(ターミナルからlsを実行した状態のログ)
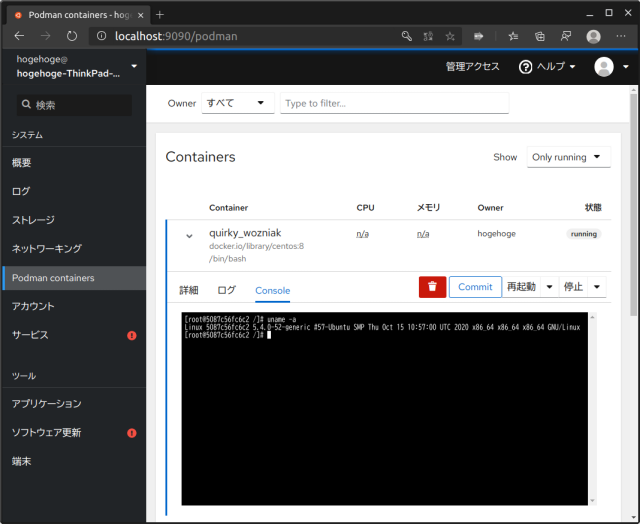
ConsoleはそのままPodmanコンテナにアタッチしてコマンドを実行できます。便利!
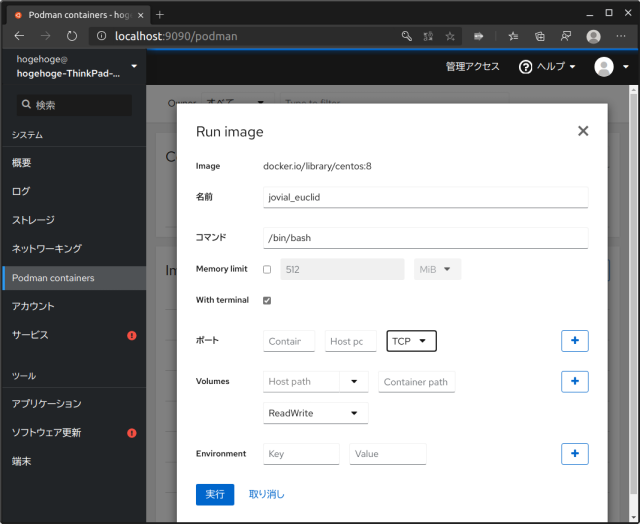
イメージの一覧からコンテナを起動する場合、オプションを指定して実行することが可能です。podman-composeを使わないコンテナの場合はCockpitから起動・停止すると楽に管理ができそうな気がします。
Podman-compose
複数のコンテナや永続データの起動順序の定義をすることで管理しやすくするdocker-composeに対応する位置づけのpodman-composeですが、pipでインストールできる版は最新から程遠い状態で放置されてしまっているので、使う場合はGithubからインストールすることになると思います。ただ、以前はサードパーティーの個人が開発していましたがPodmanと同じ位置付で開発されるようになったようです。
GitHub - containers/podman-compose: a script to run docker-compose.yml using podman
インストール
# pip3 install https://github.com/containers/podman-compose/archive/devel.tar.gz
執筆時点でインストールされたのはpodman-compose-0.1.7.dev0のようです(バージョンの確認方法が不明)
使い方はdocker-composeと同様にdocker-compose.ymlのあるディレクトリでコマンドを実行します。
どの程度使えるのかというところですが、ボリュームを扱うコンテナの実行でエラーになったりしています。podman2.0のデグレ(仕様変更?)みたいです。
Podman doesn't return error when mounting rootless container with cgroups2, but mounted directory is empty. · Issue #6856 · containers/podman
なので、実用できるかどうかは使い方によるという状態かと思います。
スポンサーリンク
comments powered by Disqus